How To Setup Stripe on WooCommerce? | AccuWebHosting

WooCommerce stands out as the top pick for eCommerce businesses, simplifies store management and facilitates sales of both physical and digital goods. Its seamless integration and robust security make it indispensable for any WordPress site. In this guide, we’ll delve into setting up Stripe on WooCommerce, exploring the reasons behind it and providing step-by-step instructions for integrating Stripe as a payment gateway on your website.
Before we get into adding this tool to your store, let us first understand Stripe, its purpose, and why it is important for your business.
Note: If you’ve got an ambitious WooCommerce plan, just a good-looking website won’t do. You need perfect hosting. At AccuWebHosting, you can get WooCommerce hosting plans dedicatedly designed to meet the requirements of a WooCommerce store. You know what? You enjoy managed hosting for as low as $9.99.
What is Stripe?
Stripe is a versatile payment processing platform designed for online financial transactions. Its user-friendly interface, seamless integration, robust security features, and support for various payment methods have made it a favoured option for eCommerce websites, particularly those built on WordPress.
It is important to emphasize that Stripe is extremely secure for customers and businesses. It can quickly filter out fraudulent payments and offers secure payment processing. This ensures that both the customer’s information and details are kept safe.
It also supports Cryptocurrency, making it an excellent choice for online businesses. This is especially important as the world is shifting towards Cryptocurrencies like Bitcoin and ETH. Mobile payment options such as Apple Pay and Google Pay can be enabled.
Stripe also offers detailed statistics and reports on payments and transactions to your website. With webhooks and detailed notifications, you can rest assured that your business payments will be seamless and hassle-free. You can also track which products you sell most and manage all your transactions using the Stripe Dashboard.
Why Should You Use WooCommerce and Stripe?
Stripe for WooCommerce features include easy-to-use payment forms and payment processing. You can also offer subscription services and automatic recurring payments with minimal hassle.
You can also enable refunds for your products with Stripe to enhance your customer service.
Stripe for WooCommerce comes completely free! The plugin comes with most of the vital features you need.
- Enables direct acceptance of credit and debit card payments
- Supports payments via Apple Pay
- Accepts payments with Alipay
- Offers on-site checkout for enhanced user experience
- Features a straightforward payment structure with minimal transaction fees
- Provides a secure and reliable payment gateway trusted by numerous customers
How to install Stripe for WooCommerce
Prerequisites
- Need HTTPS enabled on your website and activated Stripe accounts.
- Set up your WooCommerce WordPress installation.
Installing the WooCommerce Stripe plugin is necessary to begin this process. To do this,
- Login to your WordPress Dashboard.
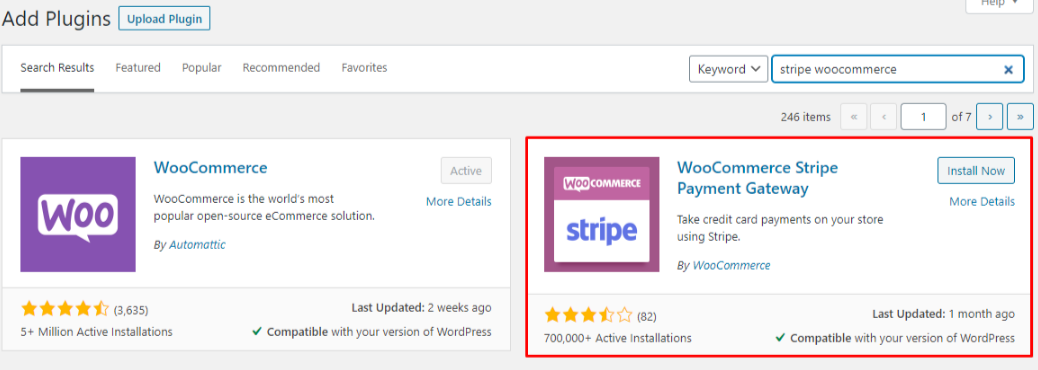
- Navigate to the Plugins > Add New.
- Next, use the search bar at the top right to search for Stripe WooCommerce.
- Tap the Install button to install the WooCommerce Stripe Payment Gateway plugin.
- Click on Activate to activate your plugin.
Step 1: Get your Stripe API keys
The Stripe API keys will be used to integrate the Stripe WordPress plugin in the next step.
- Access your Stripe dashboard and proceed to the “Get Your API keys” section.
- Copy and save both the Publishable Key and the Secret Key for future use.
Step 2: Install the Stripe WooCommerce Plugin
- Log into your WordPress dashboard.
- Navigate to Plugins > Add New and search for Stripe Payment.
- click on the Install Now button and Activate it.
- After that go to the settings for configuration.
Step 3: Configure the stripe Woo Commerce plugin
In the Payment Setting tab, paste the Publishable key and Secret keys copied earlier from the Stripe dashboard. Additionally, create a Webhook Secret Key by adding the Webhook endpoint in your Stripe dashboard.
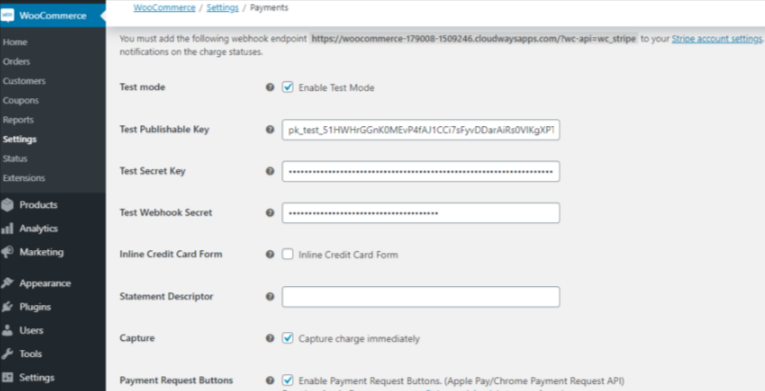
Navigate to the Currency section and verify your currency. Then, proceed to the Email Settings tab to set up options like confirmation emails for successful transactions, alerts for failed transactions, and notifications for sales.
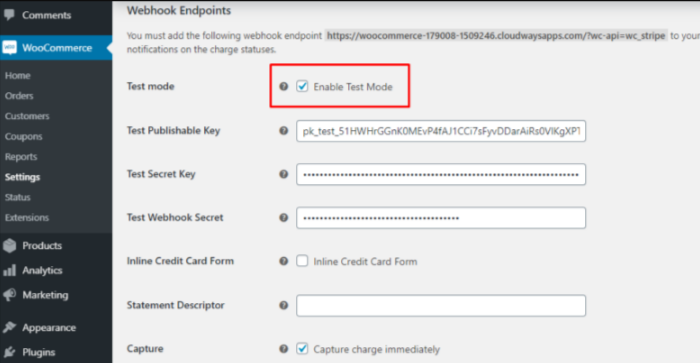
Step 4: Test stripe plugin
Test your Stripe integration with WooCommerce.
Use the Test Mode feature to simulate transactions without actual payments. This step verifies the integration’s functionality, allowing you to launch your WordPress website with a seamless payment process.
After that, switch from testing mode to live mode, navigate to the plugin’s settings, and deactivate the Test Mode.
Another way to Add Stripe to WooCommerce
Numerous plugins let you easily add Stripe to your WooCommerce store. These plugins can be found in the WordPress repository, CodeCanyon, and GitHub. Every plugin offers almost the same steps for integrating Stripe to WooCommerce.
Here are some Stripe plugins that you can use as alternative options:
- WordPress Repository
- GitHub
- CodeCanyon
Conclusion
In conclusion, setting up Stripe for WooCommerce offers a seamless payment processing solution for online transactions. With its comprehensive features, including support for various payment methods and secure transactions, Stripe enhances the overall user experience and helps streamline your eCommerce operations. By following the steps outlined in this guide, you can successfully integrate Stripe into your WooCommerce store and start accepting payments with confidence.
About the Author: Jason-Pat
Founder & CTO at AccuWebHosting.com. He shares his web hosting insights at AccuWebHosting blog. He mostly writes on the latest web hosting trends, WordPress, storage technologies, Windows and Linux hosting platforms.


