
You must have heard about the VPN. VPN is a Virtual Private Network that provides security and privacy to your private and public networks. It creates a secure connection over public network. You can connect multiple systems to VPN server and use VPN’s bandwidth for public network connection.
There are various VPN protocols for secured communication viz. IPSec, SSL and TLS, PPTP and L2TP. Of which PPTP (Point-to-Pont Tunneling Protocol) is widely used protocol. It is one of the easiest protocol to setup and maintain as compared to other protocols.
A VPN is most efficient and inexpensive way to build a secured private network. Though, it is a most inexpensive, it requires fair amount of technical expertise to implement it successfully.
There are various paid VPN softwares in the market. But, if you are running windows server, you can use RRAS to configure your own VPN server without any additional cost. This article will walk you through to install VPN using Remote & Routing Access and connect to it from your local system (With working Internet Access). (The steps are performed on Windows server 2012 R2 OS)
- Login to your server through Remote Desktop in which you want to install VPN.
- Open Server Manager and click on Add roles and features.

- Follow the steps for the installation wizard. Select ‘Role-based or feature-based installation‘ Installation Type.

- In server selection field, check ‘Select a server from the server pool‘. You will see your server with computer name in server pool.

- Select “Remote Access” role in Server roles and click on Next.

- Do not make any changes in Features and click on Next.
In Role services, select DirectAccess and VPN, Routing services and click on Next.

- Review installation page and click on install once you are ready.
Once the installation is completed, click ‘Open the Getting Started Wizard‘.

- You will see ‘Configure Remote Access‘ wizard. Click on Deploy VPN only.

- You will see Routing and Remote Access MMC. Right click on your server name and click on ‘Configure and Enable Routing and Remote Access‘.

- Now, follow the installation wizard instruction. Click Next on Welcome wizard.

- In configuration wizard, select ‘Virtual Private Network (VPN) access and NAT‘ and click on Next.

- In VPN Connection, select the network interface which has public IP address with proper Internet connection and click on Next.

- In IP Address Assignment, select ‘From a specified range of addresses‘ and click on Next.

- In Address Range Assignment, click on New and add local IP address range (Here make sure that the Start IP address is same as your Internal network’s primary IP address). This will be used to allocate IP address to remote clients who connect to this VPN server. Once you have added IP range, click on Next to proceed.

- In Managing Multiple Remote Access Server, select ‘No, use Routing and Remote Access to authenticate connection requests‘ and click on Next.

- In completing wizard, click on Finish. You will be prompted with a message for DHCP relay agent, simply click on Ok for this message.
Now, you will need to allow your RDP port in NAT services and ports. Follow the below mentioned steps for the same.
- In Routing and Remote Access, expand the server → IPV4 → NAT.

- Right click on External Network, go to properties → Services and ports.

- Click on Add, enter the description for this service, enter the RDP port and IP address of the VPS and click on Ok.

NOTE 1: If this service is not added then you will not be able to access your server via RDP.
NOTE 2: If you have firewall installed on your server, you will need to allow 1723 TCP port for PPTP.
Now, let’s tweak the setting of the user which will be used to make VPN connection from client/remote machine.
- Go to Administrative tools → Computer Management → Local Users and Groups → Users.
- Right click on the user(which you want to set for VPN connection) and click on properties.

- Go to Dial-in tab, select ‘Allow access‘ in ‘Network Access Permission’ option and click on Apply.

Your VPN server is ready for client/remote connections.
Now, let’s see how to configure client machine to connect to VPN server.
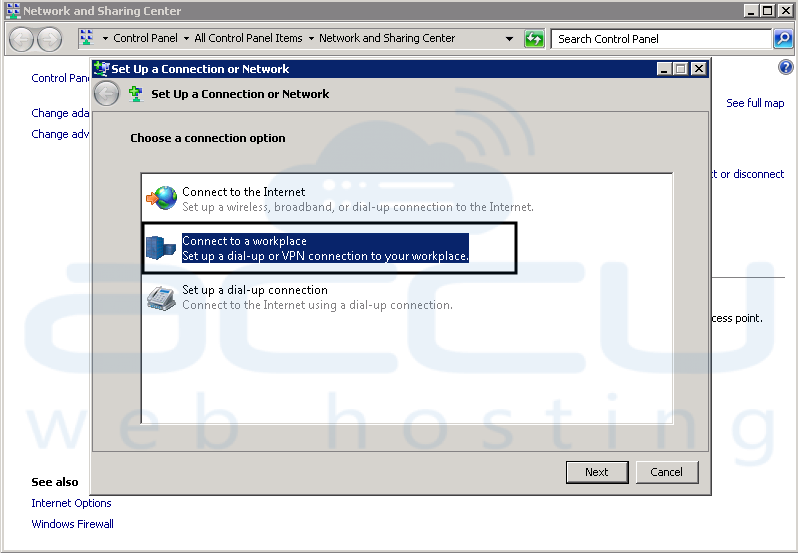
- Open Network and Sharing Center of your local system. Click on ‘Set up a new Connection or Network‘.

- Click on Connect to a workplace.
- Click on Use my Internet connection (VPN)

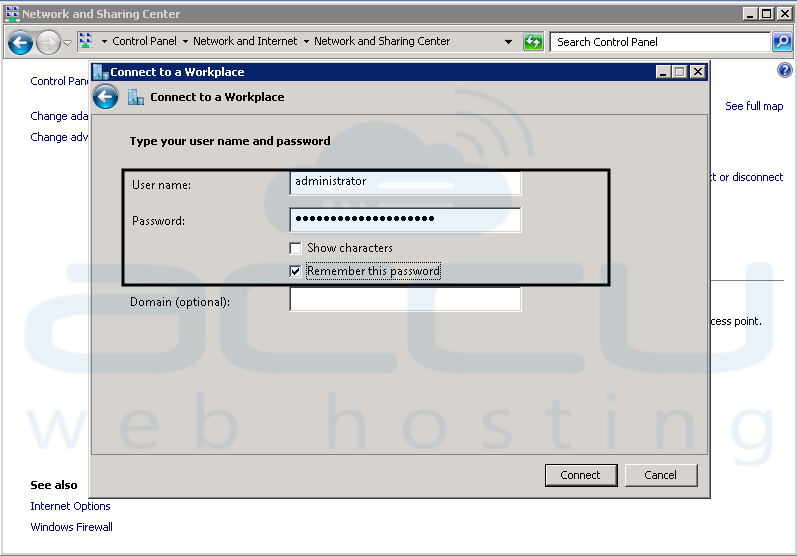
- Enter IP address of VPN server (External network’s Primary/static IP which has Internet connection) and click on next.

- Enter the login details of VPN server and click on Connect.
- And your local machine is connected to VPN server. If you check your IP address from any online tool, you will see that your IP address is from VPN server and not from local ISP.
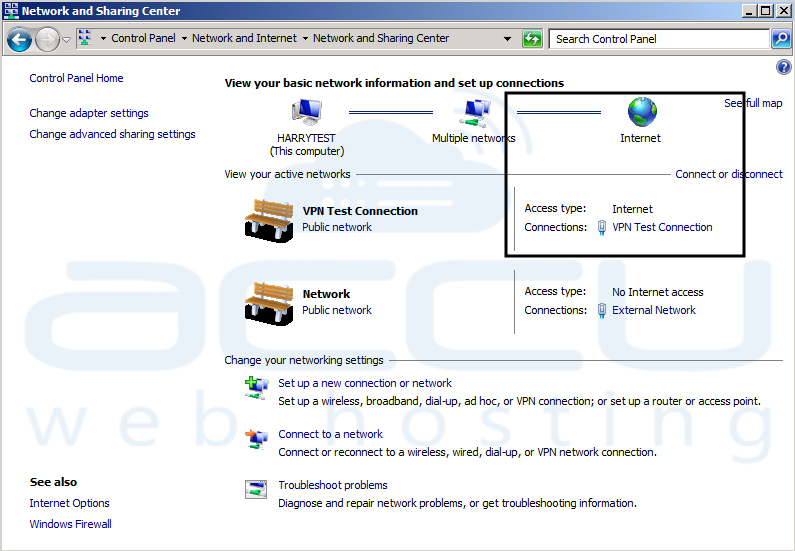
This is all. Now, your client machine will have the internet access via VPN. However, should you find any difficulty, feel free to raise your query here in this blog.

I was working on VPN installation from last 25 days with no luck. I was getting partial help from here and there. But, I got my goal of VPN installation (With working Internet) achieved with the help of your blog. Thanks a lot!!!
Thank you Hardik. Indeed I am happy to see that your problem is resolved using our blog.
This is an excellent blog post, really helped me to properly configured VPN on Windows SRV 2012 with NAT so that end user could also access the internet after connecting VPN. Just a quick addition in the above scenario: In case your machine has only one Ethernet card with public IP you need to add a loop-back network adopter as internal network card.
Thanks for nice efforts!
Muhmmad
I am glad that my blog helped you to successfully configure VPN with working Internet.
I greatly appreciate your comment. Positive comments always encourage us to do better job. Thank you very much. I will surely improvise my blog with your suggestion.
Good work.Keep it up!! I haven’t seen such detailed and functional VPN steps on the web!
I couldn’t understand the reason of allowing RDP port in NAT services? any guesses?
Phil, Thanks for your appreciation.
RDP port is added in NAT service to allow remote access of machine when RRAS service is running. If you do not set this, you will not be able to access your machine via RDP when RRAS service is running.
This post is really helpful for those who want to install and configure working VPN in one shot. Thank you very much for sharing this precious work on the net.
In “Address Range Assignment”, you have entered 11 IP addresses. Is it required to enter 11 IPs only in this option?
You are most welcome Henry! In “Address Range Assignment”, you can enter more IP if required. In our example, we have added 11 IP so 10 concurrent connections can be made to VPN server. If you need more connection then you can add multiple ranges of IP’s or add each IP manually.
Thats a great article but do you have anything to setup VPN with RADIUS server
Hey Jimmy, unfortunately, we don’t have any tutorial to setup RADIUS (Remote Authentication Dial-In User Service) server. Though I’ll certainly forward this to our research team.
Seeing the screen capture, it looks like Windows Server 2012 OS. I’d like to setup VPS with Windows Server 2016. I guess steps would be same. What’s your opinion on this?
VPN is good but costly. Plus above steps for installing VPN are too technical. Instead, I would recommend using 3rd party easy to use remote access tools like logmein, R-HUB remote support servers etc. They work well.
Hello Prasanta, That is the same reason we have created steps with the screenshot, so anyone can configure a VPN server and connect to it.
Using a normal VPN service is very easy because now there is much useful software that gives VPN services but they will not provide RRAS (Remote and Routing Access). RRAS is the advanced secure platform for browsing and accessing the internet. You have to set up this service manually and this page will give you the details on how to set it up.
Hello, please, and how would this scenario that is tapped ensure that DHCP automatically adds the same IP address to the client, or that the client can set up its own IP, but it is not possible, then it will not connect …
Does this require two network cards installed on server?
we are changing Internet Providers. I want to know if Public IP change by changing providers will affect anything with remote Access/VPN. I do not believe it would. Any assistance would be greatly appreciated
Rahul..
I have a doubt that how can i connect local LAN server to cloud server??
can a local LAN client access without changing the local IP address?
Is necessary to have 2 NIC on server? We have only 1 NIC. Is it possible to set with 1 NIC?
It is not necessary to have 2 NICs. It is obvious that if you are renting server/virtual server with remote access, it will have only one NIC attached to your machine. In that you can use loop back network adapter. Just search for how to install loop back network adapter on the server. You will see lots of guide on it. Once you are done, you can use it in place of your second NIC.
Hello. I followed this guide to create a VPN network from my clients to our server, but despite all the configurations have been properly completed, the clients are not able to connect nor by SSTP SSL or PPTP. They will not reach out the server public ip address.
Is it possible to get some assistance to get this working?
Thanks in advance.
1) You will need to make sure that Network Access Permission is Enabled for the server in which you have configured VPN. 1723
2) If your server has firewall installed, please make sure that the port 1723 is accepting inbound connection. You may check this from your client machine. CMD: telnet
Hello
First of all, forgive me for my bad English
I need Create a VPN server for change the IP address
As you know, in some countries, such as Iran,many sites have filtering problems (Sites are blocks)
I have a server in Germany. Can I create a VPN with this server to change the IP?
I was able to create a VPN server on a German server, but when User Connecting With the VPN the Internet is gon
I am very grateful for your help in this case
Looks like routing issue. You will need to make sure that
1) You have selected “Virtual Private Network (VPN) access and NAT” while configuring Routing and Remote access
2) You should recheck your NAT settings.
I have set up that VPN but my VPN client is only able to ping the private IP of the VPN server. Not able to ping/access any of the other servers in the remote LAN, I mean VPN client is not able to access all other servers / PC in VPN server’s LAN.
Hello, does this method circumvent the limit of 2 RDS users? will it be possible to connect multiple clients at the same time? Thanks so much!
Yes, you can certainly connect more than 2 clients at a time.